Apr 7, 2025
Clean Topology: Principles for Creating Production-Ready 3D Models
Guide
Good topology is the foundation of professional 3D modeling. Whether you're creating characters for animation, assets for games, or models for 3D printing, the underlying structure of your mesh determines how well it performs its intended function. This guide explores the principles of clean topology in Blender and provides practical techniques for creating production-ready models.
What is Topology?
Topology refers to the arrangement of vertices, edges, and faces that make up a 3D mesh. Good topology isn't just about making your model look nice—it affects:
How well a model deforms during animation
How efficiently it renders
How it handles subdivision and detail
How easily it can be UV unwrapped and textured
How it performs in real-time applications
Core Principles of Clean Topology
1. Edge Flow
What it is: The directional arrangement of edge loops that define the shape and potential movement of a model.
Why it matters: Proper edge flow ensures models deform naturally during animation and support the underlying anatomical or mechanical structure.
Key considerations:
Edges should follow the natural contours of the form
For character models, edge loops should correspond to muscle groups and facial expressions
For hard-surface models, edge loops should define key features and sharp transitions
Example: On a human face, edge loops should encircle the eyes, mouth, and follow the major muscle groups like the orbicularis oculi and orbicularis oris.
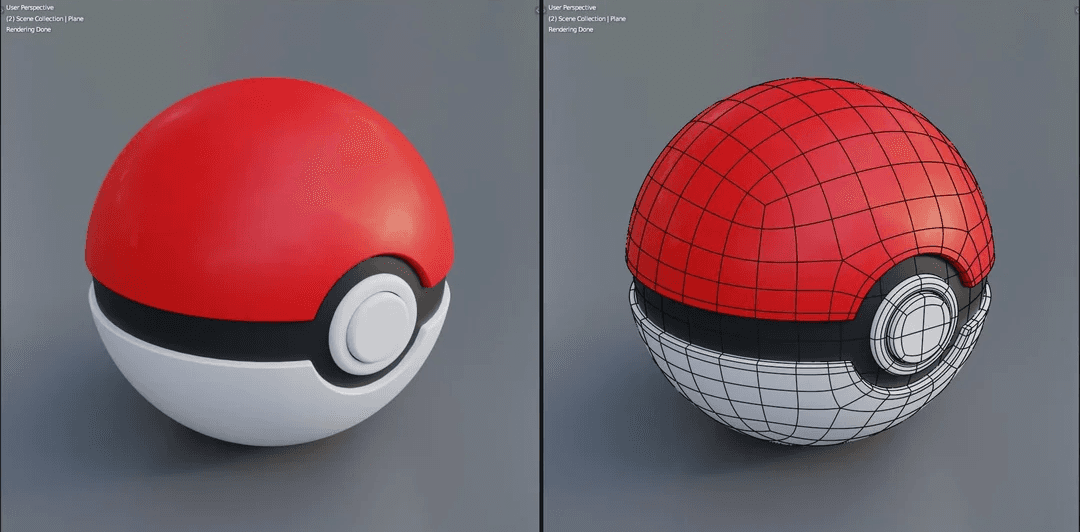
2. Quad-Based Geometry
What it is: Modeling primarily with four-sided polygons (quads).
Why it matters: Quads subdivide predictably, deform consistently, and are the industry standard for professional work.
Key considerations:
Avoid triangles (tris) in areas that will deform
Avoid n-gons (polygons with 5+ sides) except in flat, non-deforming surfaces
N-gons can cause unpredictable results with subdivision, deformation, and rendering
Exception case: Game assets often have triangulated meshes for real-time rendering, but starting with quad-based models and triangulating at export is still best practice.
3. Polygon Density and Distribution
What it is: How many polygons you use and where you place them.
Why it matters: Efficient distribution of polygons ensures detail where needed without wasting resources.
Key considerations:
Concentrate polygons in areas of high detail or significant deformation
Use fewer polygons in flat or simple areas
Maintain relatively consistent polygon sizes for best subdivision results
Consider the end-use of your model (film vs. real-time) when determining density
Example: A character model should have higher polygon density around joints, face, and hands, with lower density on limbs and torso.
4. Poles and Junctions
What it is: Points where multiple edge loops meet or terminate.
Why it matters: Poles affect how a mesh subdivides and deforms.
Types of poles:
N-pole: A vertex connected to 3 edges
Pole: A vertex connected to 5 or more edges
Key considerations:
Strategically place poles in areas with minimal deformation
Avoid poles on highly visible surfaces
Understand that poles are necessary but should be controlled
Example: In character modeling, place poles at the crown of the head or under the armpit where visibility and deformation issues are minimized.
Practical Topology Techniques in Blender
Retopology Workflow
Retopology is the process of creating a new, clean topology over an existing high-detail mesh. This is particularly useful after sculpting or when working with scanned data.
Blender tools for retopology:
Snap to Face: Enable face snapping with Project Individual Elements
Poly Build: Draw topology directly on the surface
F2 add-on: Speeds up quad-based modeling
Retopology add-ons: RetopoFlow or other specialized tools
Step-by-step process:
Position your high-resolution reference mesh
Create a new object and enter Edit mode
Enable snapping with appropriate settings
Begin placing vertices following edge flow principles
Build quads using the F key to create faces between vertices
Focus on major edge loops first, then fill in the rest
Edge Loop Placement
Understanding where to place edge loops is crucial for both organic and hard-surface modeling.
For organic models:
Place edge loops around areas of deformation (joints, facial features)
Follow the direction of muscle groups
Create supporting loops around primary features
For hard-surface models:
Use edge loops to define hard edges
Place supporting loops near hard edges for better subdivision
Maintain even spacing where possible
Support edge technique: Place edge loops close to hard edges to maintain sharpness when subdividing, instead of relying on creases.
Managing Complexity
Complex models require special considerations to maintain clean topology.
For complex organic shapes:
Use the "seam" approach: Divide the model into logical sections
Tackle each section independently with proper edge flow
Connect sections with thoughtful transitions
For complex mechanical shapes:
Use boolean operations carefully, cleaning up topology afterward
Employ modifiers non-destructively when possible
Consider kitbashing (combining parts) with clean unions
Case Studies: Before and After Topology
Case Study 1: Character Face Topology
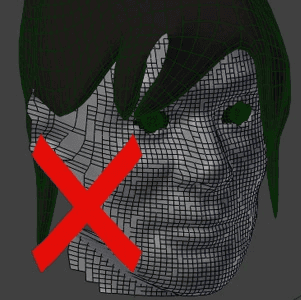
Poor topology issues:
Random edge flow not following facial muscles
Triangles and n-gons in deforming areas
Inconsistent polygon density
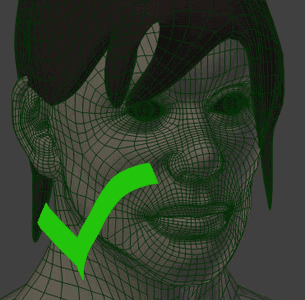
Improved topology features:
Edge loops following orbital, nasal, and mouth muscles
Quad-based mesh throughout
Strategic pole placement at the crown and under the jaw
Higher density around eyes and mouth
Case Study 2: Hard-Surface Mechanical Part
Poor topology issues:
Excessive geometry in flat areas
Pinching at curved transitions
Boolean operations left uncleaned
Improved topology features:
Clean edge loops defining key features
Support edges near sharp transitions
Efficient polygon count with detail only where needed
Properly merged boolean operations with clean transitions
If you know the use-case of your model, topology becomes a lot easier
Common Topology Problems and Solutions
Problem: Pinching during deformation
Solution: Review edge flow and ensure it follows the direction of movement. Add supporting edge loops to distribute deformation.
Problem: Shading issues on smooth surfaces
Solution: Check for n-gons or triangles causing irregular normals. Ensure relatively consistent quad sizes and proper pole placement.
Problem: Sharp edges losing definition after subdivision
Solution: Add support edge loops closer to sharp edges or use the Edge Crease feature (Shift+E).
Problem: Texture stretching
Solution: Align edge loops to follow UV seams and ensure proper edge flow for texture projection.
Topology for Different Applications
Game Assets
Lower polygon count with strategic detail
Potentially triangulated for export
Normal maps for detail instead of geometry
Consider level-of-detail (LOD) variations
Film/Animation
Higher polygon counts allowed
Focus on deformation quality over polygon efficiency
Edge loops aligned with animation requirements
Subdivision-ready topology
3D Printing
Manifold geometry (watertight with no holes)
Appropriate wall thickness
Limited overhangs
Consider support structures
Evaluation Tools and Techniques
How do you know if your topology is good? Blender offers several tools to help assess and improve mesh quality:
Visual Analysis
Enable Face Orientation (blue outside, red inside)
Use Wireframe view to examine edge flow
Check Smooth/Flat shading transitions
Modifier Testing
Apply Subdivision Surface to test how your mesh subdivides
Test with Armature modifier for deformation quality
Use Mesh Analysis tools to check for problems
Checklist for Final Review
No non-manifold edges or vertices
No overlapping faces
Proper quad-based structure
Efficient polygon count
Edge flow following form and function
Strategic pole placement
Even polygon distribution
Conclusion
Clean topology is both an art and a science. It requires understanding the technical requirements of 3D models while also developing an aesthetic sense for edge flow and structure. As you continue your journey in 3D modeling with Blender, regularly analyzing and refining your approach to topology will significantly improve the quality and versatility of your work.
Remember that topology choices should always be informed by the intended use of your model. A character that will be animated needs different considerations than a static architectural element. With practice, creating clean topology will become second nature, allowing you to produce professional-quality models suitable for any production environment.
Keep practicing, analyzing professional work, and refining your understanding of how meshes behave under different conditions. Your future self (and any technical directors you work with) will thank you for the time invested in mastering clean topology.
MY RECENT STORIES
Guide
Date